This article will teach you how to manually schedule, reschedule, update, and cancel appointments using SUMO Desktop.
How to Create a New Appointment
There are several ways to create a New Appointment.
Option 1: Click on the Calendar Tab
The most popular method is to find an opening on the calendar using Day View, and then click on the opening on the calendar to create a New Appointment. By doing so, SUMO will pre-populate the day, time, and the provider fields on the new appointment for you.
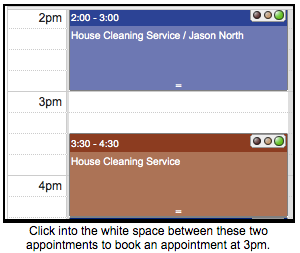
Click into the white space between these two
appointments to book an appointment at 3pm.
Option 2: From a Contact, Lead, Case, or Related Object
You may also find a “New Appointment” button on Contacts, Leads, or Cases. Additionally, you may Add a “New Appointment” button to any standard or custom object.
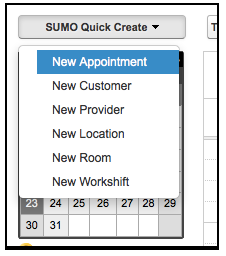
Option 3: Quick-Create
You may also use Quick-Create to create a New Appointment. However, this method will not pre-populate the day, time, and provider fields.
New Appointment Page
When you create a new appointment, you will see this page.
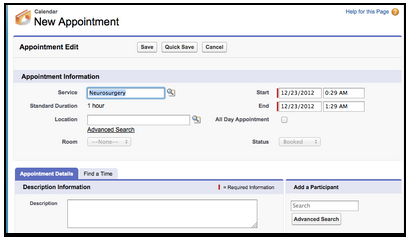
- Service – Choose the service for the appointment. The Service field allows users to choose a service from the drop down list -or- enter in anything they wish in this field, such as “Lunch with Jason”. When users type in anything, SUMO will choose the “Other” service for reporting purposes. It’s important that you train your users to choose a service from the service drop down, so you may report on this information -and- only type in a service for something that is not already listed on the service list.
- Duration – The duration for each service is predefined on the service. Users may override this and increase or decrease the duration by changing the End time of the appointment to earlier or later.
- Location – If this will be an in person appointment where the attendee is coming to you, choose your location where the appointment will take place.
- Household – If this will be an in person appointment where you will be traveling to the attendee, choose their household where the appointment will take place. If you do not see the Household field, review How to Setup Households.
- Room – Choose the room. Note you must choose the Location first, since each location may have its own rooms. If you do not see Rooms, review How to Setup Rooms.
- Start – Choose the appointment start date / time.
- End – Choose the appointment end date / time.
- All Day Appointment – This will make the “all-day” appointment appear at the top on the calendar.
- Status – The status field designates booked vs. canceled appointments and is automatically controlled.
- Description – Here you may enter an internal note.
- Add a Participant – Here you may search for participants, which will search “Contacts” in SUMO for providers, customers, partners, etc…
How to Add Standard or Custom Fields
You can also add a standard or custom fields to the New/Edit Appointment Page, if you need to tailor SUMO to your organizational needs.
Advanced Search
The Advanced Search is where you search SUMO for Providers, Customers, and Contacts. You may use the advanced search to:
- Find a provider by specialty, language spoken, location, proximity to customer, and any custom attribute you define.
- Find a customer by any custom attribute you define.
- Find a contact by any custom attribute you define.
Find-a-Time
Simply add participants and view their calendars to find openings.
Special Customer Note
This is an example of a “custom field” that you can add. This custom field is used to enter in a special note for customers, which is then merged into the email templates to customers, such as “Don’t forget to fast for 24 hours before your appointment!”.
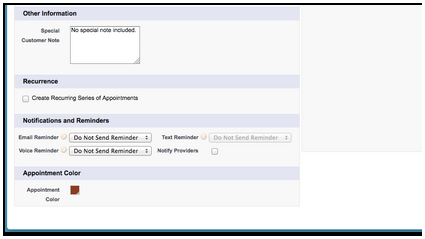
Recurrence
Here you may schedule an appointment to be recurring.
Notifications & Reminders
Here you may set when the reminder/s will be sent. If you click the “Notify Providers” checkbox, the providers will all receive reminders about the appointment. By default this is unchecked.
NOTE: See the SUMO Settings for how to enable Text Message & Voice Reminders, as well as how to customize the reminder templates.
Appointment Color
You may override the appointment color here. The default appointment colors are set for each Service, when setting up your services.
Edit an Appointment
Simply click on an appointment on the calendar and click “Edit Appointment” to edit the appointment. You may change the date/time, add/remove participants, change the location or room, etc…
Once you click “Save” or “Quick-Save” you will be asked if you would like to email an update to the participants.
Cancel an Appointment
Simply click on an appointment on the calendar and click “Cancel Appointment” to cancel the appointment.
Once you click “Save” or “Quick-Save” you will be asked if you would like to email an update to the participants, notifying them that the appointment has been canceled.